Showing 23 items matching mixing bowl
-
 Wodonga & District Historical Society Inc
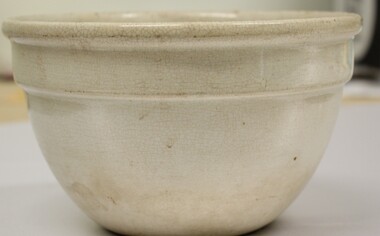
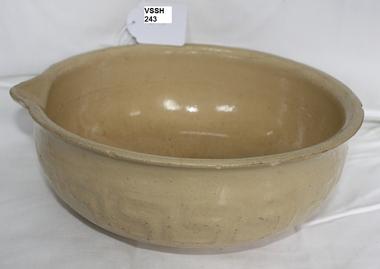
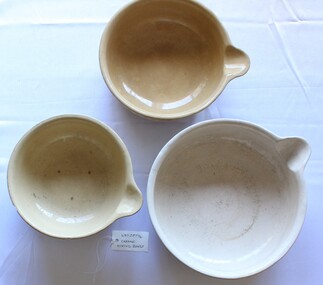
Domestic object - Ceramic mixing bowl, R. Fowler Ltd, 1930s
... Ceramic mixing bowl...Ceramic mixing bowl...A small Fowler Ware mixing bowl produced by R. Fowler Ltd.... FOWLER LTD./ THOMASTOWN/VIC" A small Fowler Ware mixing bowl ...The company R. Fowler Limited was established in Sydney, in 1837 when Enoch Fowler (1807-1879) came to Australia from Ireland and is known today as the oldest pottery still in operation in Australia. They were mostly known for producing bottles, jars, and pipes. The pottery was originally located at Abercrombie Place on Parramatta Street, Chippendale, NSW before they relocated to Glebe in 1847. Later the pottery manufactured building materials such as tiles, pipes, and chimney pots. As the business grew, they moved to Parramatta in the 1850s. Enoch's son Robert (1839-1906) had joined the company, and took over its management in 1873, changing the name to “R Fowler Sydney” in 1880. Robert opened further sites at Marrickville and Bankstown, with the company becoming R. Fowler Limited in 1919. The factory at Thomastown, Melbourne was opened in 1927 from which time the trademark on this bowl was used. An item made by an Australian company during the first half of the 20th century. The item is significant as it gives a snapshot of the early development of manufacturing companies in Australia. It is typical of kitchenware used throughout Australia during the early 20th centuryA small Fowler Ware mixing bowl produced by R. Fowler Ltd. Thomastown, Victoria with Maker's mark clearly imprinted underneath the bowl.Set in circle underneath the bowl "R. FOWLER LTD./ THOMASTOWN/VIC"kitchenware, r. fowler ltd, pottery australia -
 Clunes Museum
Domestic object - MIXING BOWL
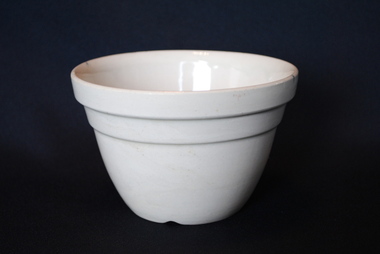
... MIXING BOWL...MIXING BOWL...CREAM COLOURED LARGE MIXING BOWL WITH SPOUT FOR POURING... BOWL Domestic object CREAM COLOURED LARGE MIXING BOWL ...CREAM COLOURED LARGE MIXING BOWL WITH SPOUT FOR POURING, SMALL CRACKS, SOME CHIPS ON THE RIMmixing bowl, ceramic bowl -
 Mont De Lancey
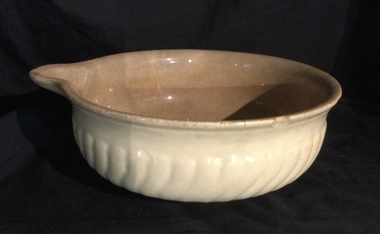
Domestic object - Mixing Bowl, early 1900's
... Mixing Bowl...Mixing bowl...A vintage medium sized cream coloured stoneware mixing bowl.... Ceramic bowl Kitchenware Cooking Mixing bowl A vintage medium ...A mass produced unbranded domestic item used before 1950's.A vintage medium sized cream coloured stoneware mixing bowl with a pouring lip for cooking. It has thick raised scalloped relief pattern around the body.ceramic bowl, kitchenware, cooking, mixing bowl -
 Blacksmith's Cottage and Forge
Bowl, mixing
... Bowl, mixing...mixing bowl...Round, cream-coloured, ceramic mixing bowl with pouring lip... Marsh goldfields Bowl, mixing Round, cream-coloured, ceramic ...Mixing bowls of this design were a common item in Austrailan kitchens in the late 19th and early 20th centuries. Women worked largely in the kitchen producing three meals daily for their families and, on farms, for the workers or casual labourers.Local significance for the history of women's work, especially the domestic duties of baking and cooking. Round, cream-coloured, ceramic mixing bowl with pouring lip, fluted design.baking, cakes, mixing bowl, kitchenware, women s work, domestic utensils, home cooked meals -
 Flagstaff Hill Maritime Museum and Village
Ceramic - Bowl, 1910 to 1950
... mixing bowl...Stoneware mixing bowl round cream with pouring lip... Warrnambool great-ocean-road Bowl Ceramic Stoneware mixing bowl round ...A mass produced unbranded utilitarian item made for domestic use no history or provenance currently available, design indicates item made before 1950Item at this time cannot be associated with an historical event, person or place, provenance is unknown, item assessed as a collection asset as made prior to 1950.Stoneware mixing bowl round cream with pouring lip and decorative scallop relief around bodyNoneflagstaff hill, warrnambool, shipwrecked coast, flagstaff hill maritime museum, flagstaff hill maritime village, great ocean road, bowl, ceramic bowl, pouring bowl, kitchen ware, cooking ware, ironstone bowl, salt glazed, mixing bowl -
 Kiewa Valley Historical Society
Bowl Ceramic
... food. mixing bowl. kitchen. cooking. ceramic....A large bone coloured mixing bowl with a lip for pouring... Ceramic A large bone coloured mixing bowl with a lip for pouring ...This bowl was mass produced and was typical of mixing bowls used in homes during the 1950's in the Kiewa Valley.Women in the Kiewa Valley cooked at home for their family and for school and church fetes. This bowl was used for cake and biscuit mixtures. A large bone coloured mixing bowl with a lip for pouring. It has diagonal grooves around the outside.food. mixing bowl. kitchen. cooking. ceramic. -
 Southern Sherbrooke Historical Society Inc.
Mixing Bowl
... Mixing Bowl... Belgrave Heights 3160 yarra-valley-and-the-dandenong-ranges Mixing ...Belonged to Cheryl Kellett and donated to Susan Heywood-Downard for the Southern Sherbrooke Historical Society. Unknown history prior to that time.Ceramic Bowl originally belonging to Cheryl Kellett. Size 12 with a small "lip" at one edge for easy pouring of contents."12" at the bottom.baking, kitchen -
 Kiewa Valley Historical Society
Bowl Enamel, unknown, circa mid to late 1900's
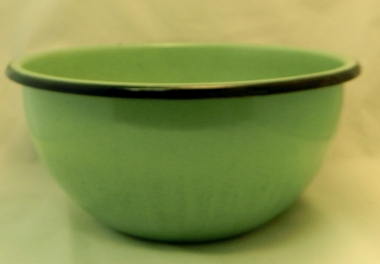
... mixing bowl...This "mixing" bowl was used in a period before electric... edge. nil This "mixing" bowl was used in a period before ...This "mixing" bowl was used in a period before electric food processors and mixers were readily available(1940's). Basic food ingrediences requiring mixing such as cakes scones and bread had to be hand blended.This mixing bowl is very significant to the Kiewa Valley andrural regions because it details not only what kitchens, be they commercial, domestic or rural camp, required to be stocked with but also a period in time when electrical goods such as blenders were not on in production and electricity was not available.This bowl is made from steel and has a green enamel covering. The rim of the bowl has a black border to highlight its edge.nilmixing bowl, kitchen -
Federation University Historical Collection
Photograph, Students mixing ingredients in a bowl, pre 2004
... Students mixing ingredients in a bowl...Laminated colour photo of a student mixing ingredients... Photograph Students mixing ingredients in a bowl Laminated colour ...Laminated colour photo of a student mixing ingredients in a bowl. alumni, hospitality -
 Kiewa Valley Historical Society
Bowl Ceramic, circa mid to late 1900's
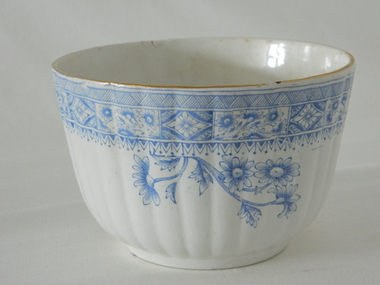
... mixing bowl... historical significance as a cheap imported mixing bowl or soup/main ...This bowl was probably used by migrant workers on the SEC Victoria Kiewa Hydro Electricity Scheme circa 1950's. Due to the uneven pattern it can be assumed that this bowl was a cheap imported one possibly from Asia.This bowl has historical significance as a cheap imported mixing bowl or soup/main meal dish that shows the influence of the migrant infusion into the Kiewa Valley, maybe in the "gold rush" era. This medium sized ceramic/porcelain bowl has a gold painted rim and fine blue hair pin patterns and flowers. The pattern has been poorly applied and the irregular top lines appear to indicate an unprofessional alignment. The exterior has a rippled formation which has not been extended to the top rim. bottom inscription too faded to readkitchen bowl, main rice dish, mixing bowl -
 Flagstaff Hill Maritime Museum and Village
Domestic object - Bowl, J & G Meakin, Late 19th or early 20th Century
... mixing bowl... Village Great Ocean Road Shipwreck Coast mixing bowl food ...The Process of Making Pottery Decorating, Firing, Glazing, Making, Technical There is a rhythm and flow to clay. It can’t be done all at once! Even the making process! It can take weeks to get everything done, especially if you can only work on your pottery once a week! Even though we have three hour classes, it’s often just not enough time! Here is an overview of some of the processes so you have a bit more grasp on some of the technical stuff! Step One – Design There are SO many ideas out there for making stuff in clay! From delicate porcelain jewellery, through to heavy sculptural work and everything in between. Deciding your direction is sometimes not that easy – when you first start, try everything, you will naturally gravitate to the style that you enjoy! The options and variations are endless and can get a wee bit overwhelming too! Check in with me before you start to ensure your ideas will work, what order you might do things, how you could achieve the look you are seeking and any other technical data required! Step Two – Making Clay is thixotropic. This means that as you work with it, the clay first gets sloppier and wetter, before is begins to dry in the atmosphere. For most things, you simply can’t do all parts of the project at once. An example of work order might look like: Get last weeks work out from the shelves Prepare clay for today’s work – roll your clay, prepare balls for throwing, make the first stage of a pinch pot) Clean up last week’s work and put it on the shelf for bisque firing Check that you have any glazing to do – and do enough of it that you will have time to finish your main project Do the next step of your next project – there might be a further step that can’t be complete immediately, in that case, wrap your work well and put onto the shelves. Letting your work rest for a while can really help keep your work clean and professional looking. Many things require bagging under plastic to keep it ready for work the next week – put your name on the outside of the bag so you can find your work easily. We have stickers and markers. Consider how you want to decorate your work – coloured slip can be applied at a fairly wet stage (remembering that it will make your work even wetter!). Trying to apply slip to dry clay won’t work! If you want to do sgraffito – you will need to keep the work leather hard (a state of dryness where you can still work the clay with a little effort and a little water and care). Step Three – Drying Most of the time your work can go into the rack uncovered to let it dry out for the following week. If you want to continue forming or shaping you will need to double bag your work – put your work on a suitable sized bat and put the bat in a bag so the base of the bag is under the bat, then put another bag over the top of the work and tuck the top of the bag under the bat. If you want to trim (or turn) your thrown work the following week, it should also be double bagged. If your work is large, delicate, or of uneven thicknesses, you should lightly cover your work for drying. When considering the drying process, bare in mind the weather, humidity and wind! The hotter and dryer, the faster things dry and work can dry unevenly in the shelves – this can lead to cracking – another time to lightly cover your work for drying. Step Four – Trimming and Cleaning Up Your work is dry! It is called greenware now and it is at it’s most fragile! Handle everything with two hands. I often refer to soft hands – keep everything gentle and with your fingers spread as much as possible. Try to not pick up things like plates too much, and always with both hands! Before your work can be bisque fired it should be “cleaned up”. You work won’t go into the kiln if it has sharp edges – when glazed, sharp edges turn into razor blades! Use a piece of fly wire to rub the work all over – this will scratch a little so be light handed. Use a knife or metal kidney to scrape any areas that require a bit more dynamic treatment than the fly wire offers! Finally, a very light wipe over with a slightly damp sponge can help soften and soothe all of your edges and dags! Trimming thrown work: If you are planning to trim (or turn) your thrown work (and you should be), make sure you bag it well – your work should be leather hard to almost dry for easiest trimming. Use this step to finish the work completely – use a metal kidney to polish the surface, or a slightly damp sponge to give a freshly thrown look. Wipe the sponge around the rim after trimming, and check the inside of the pot for dags! Trimming slip cast work: Usually I will trim the rims of your work on the wheel the following day to make that stage easier, however you will still need to check your work for lumps and bumps. Last but not least – check that your name is still clearly on the bottom of your work. Step Five – Bisque Firing When the work is completely dry it can go into the bisque kiln. The bisque kiln is fired to 1000°C. This process burns off the water in the clay as well as some of the chemically bound water. The structure of the clay is not altered that much at this temperature. Inside the bisque kiln, the work is stacked a little, small bowl inside a larger bowl and onto a heavy plate. Smaller items like decorations or drink coasters might get stacked several high. Consideration is paid to the weight of the stack and shape of the work. A bisque kiln can fire about one and a half times the amount of work that the glaze kiln can fire. The firing takes about 10 hours to complete the cycle and about two days to cool down. Once it has been emptied the work is placed in the glaze room ready for you to decorate! Step Six – Glazing Decorating your work with colour can be a lot of fun – and time consuming! There are three main options for surface treatment at this stage: Oxide Washes Underglazes Glazes Washes and underglazes do not “glaze” the work – It will still need a layer of glaze to fully seal the clay (washes don’t need glaze on surfaces not designed for food or liquid as they can gloss up a little on their own). Underglazes are stable colourants that turn out pretty much how they look in the jar. They can be mixed with each other to form other colours and can be used like water colours to paint onto your work. Mostly they should have a clear glaze on top to seal them. Oxides are a different species – the pink oxide (cobalt) wash turns out bright blue for instance. They don’t always need a glaze on top, and some glazes can change the colour of the wash! The glazes need no other “glaze” on top! Be careful of unknown glaze interactions – you can put any combination of glaze in a bowl or on a plate, but only a single glaze on the outside of any vertical surface! Glazes are a chemical reaction under heat. We don’t know the exact chemicals in the Mayco glazes we use. I can guess by the way they interact with each other, however, on the whole, you need to test every idea you have, and not run the test on a vertical surface! Simply put, glaze is a layer of glass like substance that bonds with the clay underneath. Clay is made of silica, alumina and water. Glaze is made of mostly silica. Silica has a melting point of 1700°C and we fire to 1240°C. The silica requires a “flux” to help it melt at the lower temperature. Fluxes can be all sorts of chemicals – a common one is calcium – calcium has a melting point of 2500°C, however, together they both melt at a much lower temperature! Colourants are metal oxides like cobalt (blue), chrome (green through black), copper (green, blue, even red!), manganese (black, purple and pink) iron (red brown), etc. Different chemicals in the glaze can have dramatic effects. for example, barium carbonate (which we don’t use) turns manganese bright pink! Other elements can turn manganese dioxide brown, blue, purple and reddish brown. Manganese dioxide is a flux in and of itself as well. So, glazes that get their black and purple colours, often interact with other glazes and RUN! Our mirror black is a good example – it mixes really well with many glazes because it fluxes them – causes them to melt faster. It will also bring out many beautiful colours in the glazes because it’s black colouring most definitely comes from manganese dioxide! Glaze chemistry is a whole subject on it’s own! We use commercial Mayco glazes on purpose – for their huge range of colour possibilities, stability, cool interactions, artistic freedom with the ability to easily brush the glazes on and ease of use. We currently have almost 50 glazes on hand! A major project is to test the interactions of all glazes with each other. That is 2,500 test tiles!!!! I’m going to make the wall behind the wheels the feature wall of pretty colours! Step Seven – Glaze (Gloss or sometimes called “Glost”) Firing Most of the time this is the final stage of making your creation (but not always!) The glaze kiln goes to 1240°C. This is called cone 6, or midrange. It is the low end of stoneware temperatures. Stoneware clays and glazes are typically fired at cone 8 – 10, that is 1260 – 1290°C. The energy requirement to go from 1240°C to 1280°C is almost a 30% more! Our clay is formulated to vitrify (mature, turn “glass-like”) at 1240°, as are our glazes. A glaze kiln take around 12 hours to reach temperature and two to three days to cool down. Sometimes a third firing process is required – this is for decoration that is added to work after the glaze firing. For example – adding precious metals and lustres. this firing temperature is usually around 600 – 800°C depending upon the techniques being used. There are many students interested in gold and silver trims – we will be doing this third type of firing soon! After firing your work will be in the student finished work shelves. Remember to pay for it before you head out the door! There is a small extra charge for using porcelain clay (it’s more than twice the price of regular clay), and for any third firing process! Once your work has been fired it can not turn back into clay for millennia – so don’t fire it if you don’t like it! Put it in the bucket for recycling. https://firebirdstudios.com.au/the-process-of-making-pottery/This bowl was made by renowned pottery company J & G Meakin of England. The firm was established in the mid-1800's. The bowl is an example of kitchenware used in the 19th century and still in use today.Bowl; white ceramic, round and tapering inwards towards base. Made by J and G Meakin England.On base, 'Ironstone China Reg SOL 391413' with symbolflagstaff hill, flagstaff hill maritime museum and village, warrnambool, maritime museum, maritime village, great ocean road, shipwreck coast, mixing bowl, food preparation, j & g meakin, pottery, stoke-on-trent, kitchen equipment, ceramic -
 Flagstaff Hill Maritime Museum and Village
Domestic object - Bowl, Late 19th or early 20th Century
... Mixing Bowl... Mixing Bowl Food Preparation Kitchen Equipment Ceramic ...The Process of Making Pottery Decorating, Firing, Glazing, Making, Technical There is a rhythm and flow to clay. It can’t be done all at once! Even the making process! It can take weeks to get everything done, especially if you can only work on your pottery once a week! Even though we have three hour classes, it’s often just not enough time! Here is an overview of some of the processes so you have a bit more grasp on some of the technical stuff! Step One – Design There are SO many ideas out there for making stuff in clay! From delicate porcelain jewellery, through to heavy sculptural work and everything in between. Deciding your direction is sometimes not that easy – when you first start, try everything, you will naturally gravitate to the style that you enjoy! The options and variations are endless and can get a wee bit overwhelming too! Check in with me before you start to ensure your ideas will work, what order you might do things, how you could achieve the look you are seeking and any other technical data required! Step Two – Making Clay is thixotropic. This means that as you work with it, the clay first gets sloppier and wetter, before is begins to dry in the atmosphere. For most things, you simply can’t do all parts of the project at once. An example of work order might look like: Get last weeks work out from the shelves Prepare clay for today’s work – roll your clay, prepare balls for throwing, make the first stage of a pinch pot) Clean up last week’s work and put it on the shelf for bisque firing Check that you have any glazing to do – and do enough of it that you will have time to finish your main project Do the next step of your next project – there might be a further step that can’t be complete immediately, in that case, wrap your work well and put onto the shelves. Letting your work rest for a while can really help keep your work clean and professional looking. Many things require bagging under plastic to keep it ready for work the next week – put your name on the outside of the bag so you can find your work easily. We have stickers and markers. Consider how you want to decorate your work – coloured slip can be applied at a fairly wet stage (remembering that it will make your work even wetter!). Trying to apply slip to dry clay won’t work! If you want to do sgraffito – you will need to keep the work leather hard (a state of dryness where you can still work the clay with a little effort and a little water and care). Step Three – Drying Most of the time your work can go into the rack uncovered to let it dry out for the following week. If you want to continue forming or shaping you will need to double bag your work – put your work on a suitable sized bat and put the bat in a bag so the base of the bag is under the bat, then put another bag over the top of the work and tuck the top of the bag under the bat. If you want to trim (or turn) your thrown work the following week, it should also be double bagged. If your work is large, delicate, or of uneven thicknesses, you should lightly cover your work for drying. When considering the drying process, bare in mind the weather, humidity and wind! The hotter and dryer, the faster things dry and work can dry unevenly in the shelves – this can lead to cracking – another time to lightly cover your work for drying. Step Four – Trimming and Cleaning Up Your work is dry! It is called greenware now and it is at it’s most fragile! Handle everything with two hands. I often refer to soft hands – keep everything gentle and with your fingers spread as much as possible. Try to not pick up things like plates too much, and always with both hands! Before your work can be bisque fired it should be “cleaned up”. You work won’t go into the kiln if it has sharp edges – when glazed, sharp edges turn into razor blades! Use a piece of fly wire to rub the work all over – this will scratch a little so be light handed. Use a knife or metal kidney to scrape any areas that require a bit more dynamic treatment than the fly wire offers! Finally, a very light wipe over with a slightly damp sponge can help soften and soothe all of your edges and dags! Trimming thrown work: If you are planning to trim (or turn) your thrown work (and you should be), make sure you bag it well – your work should be leather hard to almost dry for easiest trimming. Use this step to finish the work completely – use a metal kidney to polish the surface, or a slightly damp sponge to give a freshly thrown look. Wipe the sponge around the rim after trimming, and check the inside of the pot for dags! Trimming slip cast work: Usually I will trim the rims of your work on the wheel the following day to make that stage easier, however you will still need to check your work for lumps and bumps. Last but not least – check that your name is still clearly on the bottom of your work. Step Five – Bisque Firing When the work is completely dry it can go into the bisque kiln. The bisque kiln is fired to 1000°C. This process burns off the water in the clay as well as some of the chemically bound water. The structure of the clay is not altered that much at this temperature. Inside the bisque kiln, the work is stacked a little, small bowl inside a larger bowl and onto a heavy plate. Smaller items like decorations or drink coasters might get stacked several high. Consideration is paid to the weight of the stack and shape of the work. A bisque kiln can fire about one and a half times the amount of work that the glaze kiln can fire. The firing takes about 10 hours to complete the cycle and about two days to cool down. Once it has been emptied the work is placed in the glaze room ready for you to decorate! Step Six – Glazing Decorating your work with colour can be a lot of fun – and time consuming! There are three main options for surface treatment at this stage: Oxide Washes Underglazes Glazes Washes and underglazes do not “glaze” the work – It will still need a layer of glaze to fully seal the clay (washes don’t need glaze on surfaces not designed for food or liquid as they can gloss up a little on their own). Underglazes are stable colourants that turn out pretty much how they look in the jar. They can be mixed with each other to form other colours and can be used like water colours to paint onto your work. Mostly they should have a clear glaze on top to seal them. Oxides are a different species – the pink oxide (cobalt) wash turns out bright blue for instance. They don’t always need a glaze on top, and some glazes can change the colour of the wash! The glazes need no other “glaze” on top! Be careful of unknown glaze interactions – you can put any combination of glaze in a bowl or on a plate, but only a single glaze on the outside of any vertical surface! Glazes are a chemical reaction under heat. We don’t know the exact chemicals in the Mayco glazes we use. I can guess by the way they interact with each other, however, on the whole, you need to test every idea you have, and not run the test on a vertical surface! Simply put, glaze is a layer of glass like substance that bonds with the clay underneath. Clay is made of silica, alumina and water. Glaze is made of mostly silica. Silica has a melting point of 1700°C and we fire to 1240°C. The silica requires a “flux” to help it melt at the lower temperature. Fluxes can be all sorts of chemicals – a common one is calcium – calcium has a melting point of 2500°C, however, together they both melt at a much lower temperature! Colourants are metal oxides like cobalt (blue), chrome (green through black), copper (green, blue, even red!), manganese (black, purple and pink) iron (red brown), etc. Different chemicals in the glaze can have dramatic effects. for example, barium carbonate (which we don’t use) turns manganese bright pink! Other elements can turn manganese dioxide brown, blue, purple and reddish brown. Manganese dioxide is a flux in and of itself as well. So, glazes that get their black and purple colours, often interact with other glazes and RUN! Our mirror black is a good example – it mixes really well with many glazes because it fluxes them – causes them to melt faster. It will also bring out many beautiful colours in the glazes because it’s black colouring most definitely comes from manganese dioxide! Glaze chemistry is a whole subject on it’s own! We use commercial Mayco glazes on purpose – for their huge range of colour possibilities, stability, cool interactions, artistic freedom with the ability to easily brush the glazes on and ease of use. We currently have almost 50 glazes on hand! A major project is to test the interactions of all glazes with each other. That is 2,500 test tiles!!!! I’m going to make the wall behind the wheels the feature wall of pretty colours! Step Seven – Glaze (Gloss or sometimes called “Glost”) Firing Most of the time this is the final stage of making your creation (but not always!) The glaze kiln goes to 1240°C. This is called cone 6, or midrange. It is the low end of stoneware temperatures. Stoneware clays and glazes are typically fired at cone 8 – 10, that is 1260 – 1290°C. The energy requirement to go from 1240°C to 1280°C is almost a 30% more! Our clay is formulated to vitrify (mature, turn “glass-like”) at 1240°, as are our glazes. A glaze kiln take around 12 hours to reach temperature and two to three days to cool down. Sometimes a third firing process is required – this is for decoration that is added to work after the glaze firing. For example – adding precious metals and lustres. this firing temperature is usually around 600 – 800°C depending upon the techniques being used. There are many students interested in gold and silver trims – we will be doing this third type of firing soon! After firing your work will be in the student finished work shelves. Remember to pay for it before you head out the door! There is a small extra charge for using porcelain clay (it’s more than twice the price of regular clay), and for any third firing process! Once your work has been fired it can not turn back into clay for millennia – so don’t fire it if you don’t like it! Put it in the bucket for recycling. https://firebirdstudios.com.au/the-process-of-making-pottery/ The bowl is an example of kitchenware used in the 19th century and still in use today.Bowl white ceramic. Crack on side. Badly stained.Backstamp very faint and unable to be read.flagstaff hill, warrnambool, shipwrecked-coast, flagstaff-hill, flagstaff-hill-maritime-museum, maritime-museum, shipwreck-coast, flagstaff-hill-maritime-village, mixing bowl, food preparation, kitchen equipment, ceramic -
 Wodonga & District Historical Society Inc
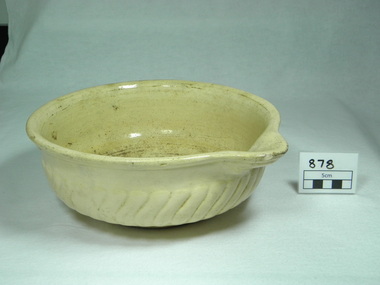
Domestic object - Ceramic mixing bowls, 1900 - 1950
... mixing bowl... in the early 20th century. No clear provence determined mixing bowl ...Mixing bowls of this design were a common item in Austrailan kitchens in the late 19th and early 20th centuries. At this time the majority of women worked at home looking after their family and producing home-cooked meals. This type of bowl was a common domestic appliance used daily in Australian homes.This item is typical of kitchen utensils used in Australian homes in the early 20th century. No clear provence determined3 ceramic round mixing bowls of various widths - 340 mm, 300 mm and 265 mm. Each bowl has a pouring lip and decorative scallop relief around body. There is no indication of makers mark or source of production.Nonemixing bowl, domestic appliances -
Mont De Lancey
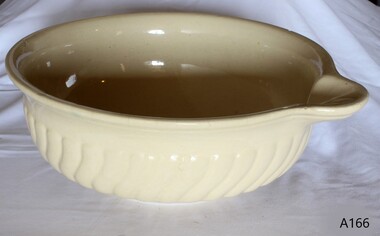
Domestic object - Mixing Bowls, early 1900's
... Mixing bowl.... Ceramic bowl Kitchenware Cooking Mixing bowl Three vintage ...Mass produced unbranded domestic items used before 1950's.Three vintage different sized cream coloured stoneware mixing bowls with a pouring lip for cooking. They have a thick raised scalloped relief pattern around the body. There are two large and one medium sized.ceramic bowl, kitchenware, cooking, mixing bowl -
 Anglesea and District Historical Society
Electric Food Mixer, Estimated pre- WW2
... painted pale green including rotating stand for placing mixing... pale green including rotating stand for placing mixing bowl ..."Marvel" Electric Food Mixer - two beaters affixed to cylindical component that encases electric motor with cord attached - this component attached to metal stand with swivelling device - all metal painted pale green including rotating stand for placing mixing bowl on - black plastic? handle on moveable top section and circular open holes on top and around the sides.Plaque affixed to cylindrical section reads "75 watt/VOLTS AC DC 25 STYLE 21 No 1304082/MARVEL/Electric Food Mixer/Licensed under United States Patents/No's...... -
 Whitehorse Historical Society Inc.
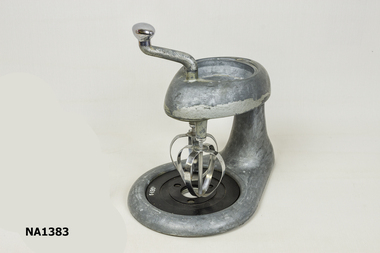
Machine - Food Mixer, Lemon Squeezer
... . Bowl to mix in missing. Has five small rubber legs.Has... plastic base to hold missing lemon squeezer. Bowl to mix ...Hinged food mixer with egg beater blades of chrome plated steel. Brass handle, chromed. Base worked steel painted with hammertone paint. White plastic base to hold missing lemon squeezer. Bowl to mix in missing. Has five small rubber legs.Has a planetary action and is hand driven. Beats eggs, cream and potatoes. The juice can run down into the basin when lemon is squeezed.domestic items, food preparation -
 City of Moorabbin Historical Society (Operating the Box Cottage Museum)
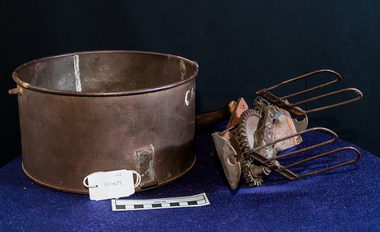
Kitchen Equipment, Mechanical Cake mixer c 1890, c1880
A mixer is a kitchen utensil which uses a gear-driven mechanism to rotate a set of beaters in a bowl containing the food to be prepared. It automates the repetitive tasks of stirring, whisking or beating. Mixers for the kitchen first came into use midway through the nineteenth century; the earliest were mechanical devices. The mixer with rotating parts was patented in 1856 by Ralph Collier a tinsmith in Baltimore, Maryland .This was followed by E.P. Griffith's whisk patented in England in 1857. A circular tin used for mixing batters. The 2 beaters are of wire, with metal gears, suspended from a metal strip that fits over the tin bowl. and is clamped into place by a metal screw . A crank handle with a wooden black knob attached by a screw is turned by hand to mix the batter in the base. This tin could be secured to a table by a clamp and screw. cooking, kitchen equipment, dairy, cakes, housework, early settlers, pioneers, baking, nutrition, blacksmiths, market gardeners, cake mixers, moorabbin, cheltenham, bentleigh, brighton -
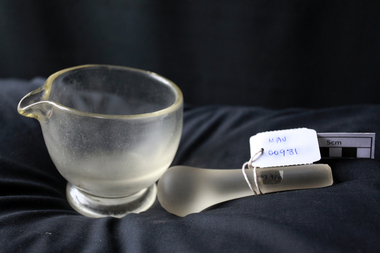 City of Moorabbin Historical Society (Operating the Box Cottage Museum)
Manufactured Glass, Pharmacy mortar & pestle, 20thC
The mortar is a bowl, typically made of hard wood, ceramic or stone. The pestle is a heavy club-shaped object, the end of which is used for crushing and grinding. The substance to be ground is placed in the mortar and ground, crushed or mixed with the pestle. The mortar and pestle is usually utilised when cooking and when crushing ingredients for a certain drug in pharmacies. For pharmaceutical use, the mortar and the head of the pestle are usually made of porcelain, while the handle of the pestle is made of wood. This is known as a Wedgwood mortar and pestle and originated in 1779. Glass mortars and pestles are fragile, but stain-resistant and suitable for use with liquids. However, they do not grind as finely as the ceramic type The mortar is a thick clear glass bowl and the pestle is a solid clear glass club-shaped tool for crushing tablets to a finer powder or mixing liquids by a pharmacist.pharmacy, mortar & pestle, medications, medicines, glass manufacturing, glass works, early settlers, moorabbin, bentleigh, cheltenham -
 City of Moorabbin Historical Society (Operating the Box Cottage Museum)
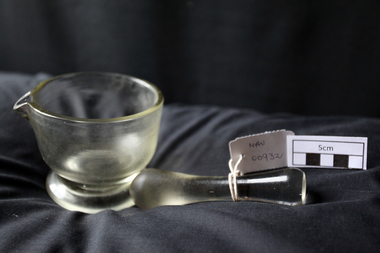
Manufactured Glass, Pharmacy mortar and pestle, 20thC
The mortar is a bowl, typically made of hard wood, ceramic or stone. The pestle is a heavy club-shaped object, the end of which is used for crushing and grinding. The substance to be ground is placed in the mortar and ground, crushed or mixed with the pestle. The mortar and pestle is usually utilised when cooking and when crushing ingredients for a certain drug in pharmacies. For pharmaceutical use, the mortar and the head of the pestle are usually made of porcelain, while the handle of the pestle is made of wood. This is known as a Wedgwood mortar and pestle and originated in 1779Glass mortars and pestles are fragile, but stain-resistant and suitable for use with liquids. However, they do not grind as finely as the ceramic type The mortar is a thick clear glass bowl and the pestle is a solid clear glass club-shaped tool used by pharmacists for crushing tablets to a finer powder or mixing liquids pharmacy, mortar & pestle, medications, medicines, glass manufacturing, glass works, early settlers, moorabbin, bentleigh, cheltenham -
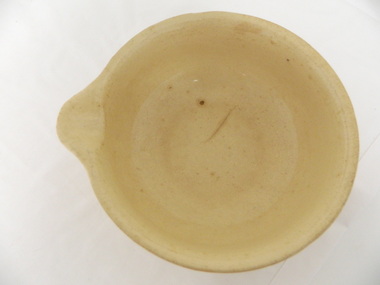
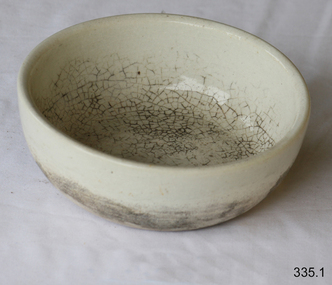 Flagstaff Hill Maritime Museum and Village
Container - Bowl, Late 19th or early 20th Century
Human beings appear to have been making their own ceramics for at least 26,000 years, subjecting clay and silica to intense heat to fuse and form ceramic materials. The earliest found so far were in southern central Europe and were sculpted figures, not dishes. The earliest known pottery was made by mixing animal products with clay and baked in kilns at up to 800°C. While actual pottery fragments have been found up to 19,000 years old, it was not until about ten thousand years later that regular pottery became common. An early people that spread across much of Europe is named after its use of pottery, the Corded Ware culture. These early Indo-European peoples decorated their pottery by wrapping it with rope, while still wet. When the ceramics were fired, the rope burned off but left a decorative pattern of complex grooves on the surface. The invention of the wheel eventually led to the production of smoother, more even pottery using the wheel-forming technique, like the pottery wheel. Early ceramics were porous, absorbing water easily. It became useful for more items with the discovery of glazing techniques, coating pottery with silicon, bone ash, or other materials that could melt and reform into a glassy surface, making a vessel less pervious to water. https://en.wikipedia.org/wiki/CeramicThe discovery and development of ceramics in numerous shapes, form and materials, revolutionised the world.Plain cream ceramic bowl with flat bottom inside. Shiny glaze fades to flat texture towards base. Possibly hand thrown pottery. No backstamp. Bad crazing and staining.None.flagstaff hill, warrnambool, shipwrecked-coast, flagstaff-hill, flagstaff-hill-maritime-museum, maritime-museum, shipwreck-coast, flagstaff-hill-maritime-village, ceramics -
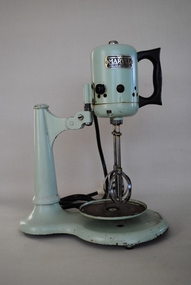
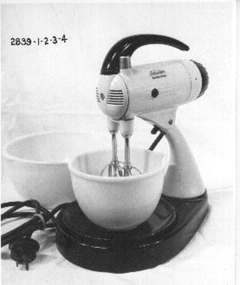
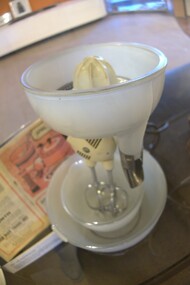 Kiewa Valley Historical Society
Mix Master
... for juice to flow into a bowl. 'Sunbeam' (in red) / 'Mix Master ...The Kiewa Hydro Electric Scheme (KHES) produced electricity for the people living in the Kiewa Valley and beyond to many parts of Victoria. The people and their families working on the scheme were encouraged by their employer the State Electricity Commission of Victoria to purchase and use electrical appliances. The mix master was popular for mixing food for baking and for making juice drinks. Ron White owned this 1950s vintage Sunbeam model 9 mixer with stand, milk glass bowls and complete juicer. Ron was a senior member of staff during the construction and operation of the KHES.This mix master was owned by Ron White who was appointed Area Operations Engineer Kiewa in June 1956. Ron was later appointed General Superintendent and then in 1974 to principal Hydro Engineer of the recently titled Hydro Division.White electrical food mixer with six parts. 1. Motor upright - white, on black stand horizontal. Black dial at back with speeds numbered and type of mix eg. mash. Front switch on/off. Black electric cord attached. Long black handle on one side. 2 Two beaters, silver 3. Bowls, white one small and one large. The small one has a spout. 4. Squeezer, white - fits on top for juicing. Parts as with orange juicer and with funnel at the front for juice to flow into a bowl.'Sunbeam' (in red) / 'Mix Master' in (black) on gold oblong 'emblem' sunbeam mix master; kitchen appliance; cooking; ron white; kiewa hydro electric scheme; food preparation -
 Anglesea and District Historical Society
Earthernware Bowl, Hoffman
... Cream coloured bowl used for mixing.... used for mixing. HOFFMAN AUSTRALIA 42 earthenware bowl Hoffman ...Cream coloured bowl used for mixing.HOFFMAN AUSTRALIA 42earthenware, bowl -
 Whitehorse Historical Society Inc.
Machine - Food Mixer, c1942
Donated by Norm Foun.|Made at Lithgow N.S.W. Small Arms Factory Aust in approx 1942.Sunbeam Mix Master - white enameled metal electric mixer with speed controls at one end and provision for the beater blades at other. Mounted on a black base with a turntable for turning the bowl. Black cord with Ring Grip plug. Two white opaque glass bowls. Two metal beaters.Sunbeam Mixmasterdomestic items, cooking